https://docs.spring.io/spring-batch/docs/current/reference/html/job.html#advancedMetaData
Configuring and Running a Job
If a group of Jobs share similar but not identical configurations, it may help to define a “parent” Job from which the concrete Job instances can inherit properties. Similar to class inheritance in Java, a “child” Job combines its elements and attr
docs.spring.io
잘못된 내용이 있다면 알려주세요 🖥️
Advanced Metadata Usage
지금까지 JobLauncher, JobRepository interface 에 대해 다뤘다
batch domain objects의 간단한 작업 launching 과 기본 CRUD 작업을 보여준다
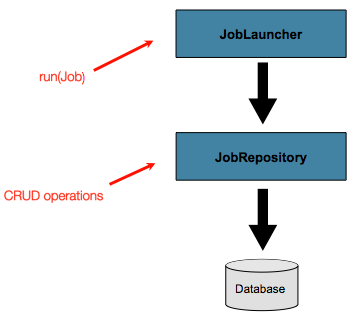
JobLauncher는 JobRepository를 사용하여 새로운 JobExecution 객체를 생성하고 실행한다.
작업 및 단계 구현은 나중에 작업 실행 중 동일한 실행의 기본 업데이트에 동일한 JobRepository를 사용한다.
간단한 시나리오에는 기본 작업으로 충분하다.
그러나 수백 개의 배치 작업과 복잡한 스케줄링 요구 사항이 있는 대규모 배치 환경에서는 메타데이터에 대한 고급 액세스가 필요할 것이다.
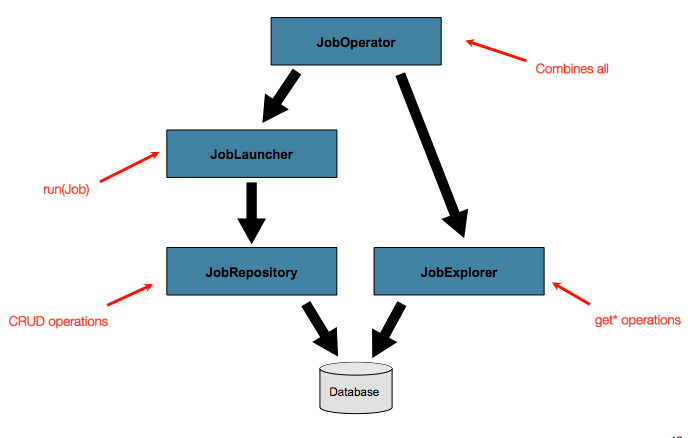
복잡한 작업에서 JobExplorer 및 JobOperator 인터페이스는 메타데이터 쿼리 및 제어를 위한 추가 기능을 추가하면 된다
(아래에 나올 내용)
Querying the Repository
The most basic need before any advanced features is the ability to query the repository for existing executions. This functionality is provided by the JobExplorer interface:
public interface JobExplorer {

    List<JobInstance> getJobInstances(String jobName, int start, int count);

    JobExecution getJobExecution(Long executionId);

    StepExecution getStepExecution(Long jobExecutionId, Long stepExecutionId);

    JobInstance getJobInstance(Long instanceId);

    List<JobExecution> getJobExecutions(JobInstance jobInstance);

    Set<JobExecution> findRunningJobExecutions(String jobName);
}
JobExplorer 는 읽기만 가능하고, 쉽게 구성이 가능하다
As is evident from its method signatures, JobExplorer is a read-only version of the JobRepository, and, like the JobRepository, it can be easily configured by using a factory bean.
The following example shows how to configure a JobExplorer in XML:
<bean id="jobExplorer" class="org.spr...JobExplorerFactoryBean"
      p:dataSource-ref="dataSource" />
The following example shows how to configure a JobExplorer in Java:
...
// This would reside in your DefaultBatchConfiguration extension
@Bean
public JobExplorer jobExplorer() throws Exception {
	JobExplorerFactoryBean factoryBean = new JobExplorerFactoryBean();
	factoryBean.setDataSource(this.dataSource);
	return factoryBean.getObject();
}
...
Earlier in this chapter, we noted that you can modify the table prefix of the JobRepository to allow for different versions or schemas. Because the JobExplorer works with the same tables, it also needs the ability to set a prefix.
The following example shows how to set the table prefix for a JobExplorer in XML:
<bean id="jobExplorer" class="org.spr...JobExplorerFactoryBean"
		p:tablePrefix="SYSTEM."/>
The following example shows how to set the table prefix for a JobExplorer in Java:
...
// This would reside in your DefaultBatchConfiguration extension
@Bean
public JobExplorer jobExplorer() throws Exception {
	JobExplorerFactoryBean factoryBean = new JobExplorerFactoryBean();
	factoryBean.setDataSource(this.dataSource);
	factoryBean.setTablePrefix("SYSTEM.");
	return factoryBean.getObject();
}
...
JobRegistry
JobRegistry(JobLocator 및 상위 인터페이스)는 필수는 아니지만 context에서 사용 가능한 작업을 추적할 때 유용하다
또한 작업이 다른 위치(예: 하위 컨텍스트)에서 생성된 경우 애플리케이션 컨텍스트에서 중앙 집중식으로 작업을 수집하는 데 유용하다.
커스텀된 JobRegistry 구현을 사용하여 등록된 작업의 이름 및 기타 특성을 조작할 수도 있다.
프레임워크에서 제공하는 구현은 단 하나이며 이는 작업 이름에서 작업 인스턴스로의 단순 맵을 기반으로 한다
The following example shows how to include a JobRegistry for a job defined in XML:
<bean id="jobRegistry" class="org.springframework.batch.core.configuration.support.MapJobRegistry" />When using @EnableBatchProcessing, a JobRegistry is provided for you. The following example shows how to configure your own JobRegistry:
...
// This is already provided via the @EnableBatchProcessing but can be customized via
// overriding the bean in the DefaultBatchConfiguration
@Override
@Bean
public JobRegistry jobRegistry() throws Exception {
	return new MapJobRegistry();
}
...
You can populate a JobRegistry in either of two ways: by using a bean post processor or by using a registrar lifecycle component. The coming sections describe these two mechanisms.
JobRegistryBeanPostProcessor
생성된 모든 job을 등록할 수 있는 bean post processor
xml코드
<bean id="jobRegistryBeanPostProcessor" class="org.spr...JobRegistryBeanPostProcessor">
    <property name="jobRegistry" ref="jobRegistry"/>
</bean>
자바코드
@Bean
public JobRegistryBeanPostProcessor jobRegistryBeanPostProcessor(JobRegistry jobRegistry) {
    JobRegistryBeanPostProcessor postProcessor = new JobRegistryBeanPostProcessor();
    postProcessor.setJobRegistry(jobRegistry);
    return postProcessor;
}
반드시 필요한 것은 아니다. 위의 예제는 자식 context(예: 부모 빈 정의)에 포함될 수 있고 거기에서 생성된 모든 작업이 자동으로 등록되도록 id를 부여했다.
AutomaticJobRegistrar
AutomaticJobRegistrar는 하위 컨텍스트를 생성하고 생성된 컨텍스트에서 작업을 등록하는 수명 주기 구성 요소이다.
이렇게 하는 것의 장점 하나는 자식 컨텍스트의 작업 이름이 여전히 레지스트리에서 전역적으로 고유해야 하지만 해당 종속성이 "natural"한 이름을 가질 수 있다는 것이다.
예를 들어 각각 하나의 Job만 있지만 reader와 같이 동일한 bean 이름을 가진 ItemReader의 정의가 서로 다른 XML 구성 파일 세트를 생성할 수 있다. 이러한 모든 파일을 동일한 컨텍스트로 가져온 경우 판독기 정의가 충돌하고 서로 재정의하지만 AutomaticJobRegistrar를 사용하면 이를 방지할 수 있다. 애플리케이션의 개별 모듈에서 제공된 작업을 더 쉽게 통합할 수 있다.
include the AutomaticJobRegistrar for a job defined
xml
<bean class="org.spr...AutomaticJobRegistrar">
   <property name="applicationContextFactories">
      <bean class="org.spr...ClasspathXmlApplicationContextsFactoryBean">
         <property name="resources" value="classpath*:/config/job*.xml" />
      </bean>
   </property>
   <property name="jobLoader">
      <bean class="org.spr...DefaultJobLoader">
         <property name="jobRegistry" ref="jobRegistry" />
      </bean>
   </property>
</bean>
java
@Bean
public AutomaticJobRegistrar registrar() {

    AutomaticJobRegistrar registrar = new AutomaticJobRegistrar();
    registrar.setJobLoader(jobLoader());
    registrar.setApplicationContextFactories(applicationContextFactories());
    registrar.afterPropertiesSet();
    return registrar;

}
registrar는 ApplicationContextFactory 배열(이전 예제에서 편리한 팩토리 빈에서 생성됨)과 JobLoader의 두 가지 필수 속성을 가진다. JobLoader는 자식 컨텍스트의 수명 주기를 관리하고 JobRegistry에 작업을 등록하는 역할을 한다.
ApplicationContextFactory는 자식 컨텍스트 생성을 담당한다. 가장 일반적인 사용법은 (이전 예제처럼) ClassPathXmlApplicationContextFactory를 사용하는 것이다.
이 팩토리의 기능 중 하나는 기본적으로 상위 컨텍스트에서 하위 컨텍스트로 일부 구성을 복사한다는 것이다.
부모와 동일해야 한다면 자식에서 PropertyPlaceholderConfigurer 또는 AOP 구성을 재정의할 필요가 없다.
JobRegistryBeanPostProcessor와 함께 AutomaticJobRegistrar를 사용할 수 있다(DefaultJobLoader도 사용할때). 기본 상위 컨텍스트와 하위 위치에 정의된 작업이 있는 경우이다.
JobOperator
As previously discussed, the JobRepository provides CRUD operations on the meta-data, and the JobExplorer provides read-only operations on the metadata. However, those operations are most useful when used together to perform common monitoring tasks such as stopping, restarting, or summarizing a Job, as is commonly done by batch operators. Spring Batch provides these types of operations in the JobOperator interface:
public interface JobOperator {

    List<Long> getExecutions(long instanceId) throws NoSuchJobInstanceException;

    List<Long> getJobInstances(String jobName, int start, int count)
          throws NoSuchJobException;

    Set<Long> getRunningExecutions(String jobName) throws NoSuchJobException;

    String getParameters(long executionId) throws NoSuchJobExecutionException;

    Long start(String jobName, String parameters)
          throws NoSuchJobException, JobInstanceAlreadyExistsException;

    Long restart(long executionId)
          throws JobInstanceAlreadyCompleteException, NoSuchJobExecutionException,
                  NoSuchJobException, JobRestartException;

    Long startNextInstance(String jobName)
          throws NoSuchJobException, JobParametersNotFoundException, JobRestartException,
                 JobExecutionAlreadyRunningException, JobInstanceAlreadyCompleteException;

    boolean stop(long executionId)
          throws NoSuchJobExecutionException, JobExecutionNotRunningException;

    String getSummary(long executionId) throws NoSuchJobExecutionException;

    Map<Long, String> getStepExecutionSummaries(long executionId)
          throws NoSuchJobExecutionException;

    Set<String> getJobNames();

}
The preceding operations represent methods from many different interfaces, such as JobLauncher, JobRepository, JobExplorer, and JobRegistry. For this reason, the provided implementation of JobOperator (SimpleJobOperator) has many dependencies.
The following example shows a typical bean definition for SimpleJobOperator in XML:
<bean id="jobOperator" class="org.spr...SimpleJobOperator">
    <property name="jobExplorer">
        <bean class="org.spr...JobExplorerFactoryBean">
            <property name="dataSource" ref="dataSource" />
        </bean>
    </property>
    <property name="jobRepository" ref="jobRepository" />
    <property name="jobRegistry" ref="jobRegistry" />
    <property name="jobLauncher" ref="jobLauncher" />
</bean>
The following example shows a typical bean definition for SimpleJobOperator in Java:
 /**
  * All injected dependencies for this bean are provided by the @EnableBatchProcessing
  * infrastructure out of the box.
  */
 @Bean
 public SimpleJobOperator jobOperator(JobExplorer jobExplorer,
                                JobRepository jobRepository,
                                JobRegistry jobRegistry,
                                JobLauncher jobLauncher) {

	SimpleJobOperator jobOperator = new SimpleJobOperator();
	jobOperator.setJobExplorer(jobExplorer);
	jobOperator.setJobRepository(jobRepository);
	jobOperator.setJobRegistry(jobRegistry);
	jobOperator.setJobLauncher(jobLauncher);

	return jobOperator;
 }
As of version 5.0, the @EnableBatchProcessing annotation automatically registers a job operator bean in the application context.
| If you set the table prefix on the job repository, do not forget to set it on the job explorer as well. |
JobParametersIncrementer
Most of the methods on JobOperator are self-explanatory, and you can find more detailed explanations in the Javadoc of the interface. However, the startNextInstance method is worth noting. This method always starts a new instance of a Job. This can be extremely useful if there are serious issues in a JobExecution and the Job needs to be started over again from the beginning. Unlike JobLauncher (which requires a new JobParameters object that triggers a new JobInstance), if the parameters are different from any previous set of parameters, the startNextInstance method uses the JobParametersIncrementer tied to the Job to force the Job to a new instance:
public interface JobParametersIncrementer {

    JobParameters getNext(JobParameters parameters);

}
The contract of JobParametersIncrementer is that, given a JobParameters object, it returns the “next” JobParameters object by incrementing any necessary values it may contain. This strategy is useful because the framework has no way of knowing what changes to the JobParameters make it the “next” instance. For example, if the only value in JobParameters is a date and the next instance should be created, should that value be incremented by one day or one week (if the job is weekly, for instance)? The same can be said for any numerical values that help to identify the Job, as the following example shows:
public class SampleIncrementer implements JobParametersIncrementer {

    public JobParameters getNext(JobParameters parameters) {
        if (parameters==null || parameters.isEmpty()) {
            return new JobParametersBuilder().addLong("run.id", 1L).toJobParameters();
        }
        long id = parameters.getLong("run.id",1L) + 1;
        return new JobParametersBuilder().addLong("run.id", id).toJobParameters();
    }
}
In this example, the value with a key of run.id is used to discriminate between JobInstances. If the JobParameters passed in is null, it can be assumed that the Job has never been run before and, thus, its initial state can be returned. However, if not, the old value is obtained, incremented by one, and returned.
Stopping a Job
One of the most common use cases of JobOperator is gracefully stopping a Job:
Set<Long> executions = jobOperator.getRunningExecutions("sampleJob");
jobOperator.stop(executions.iterator().next());
The shutdown is not immediate, since there is no way to force immediate shutdown, especially if the execution is currently in developer code that the framework has no control over, such as a business service. However, as soon as control is returned back to the framework, it sets the status of the current StepExecution to BatchStatus.STOPPED, saves it, and does the same for the JobExecution before finishing.
Aborting a Job
A job execution that is FAILED can be restarted (if the Job is restartable). A job execution whose status is ABANDONED cannot be restarted by the framework. The ABANDONED status is also used in step executions to mark them as skippable in a restarted job execution. If a job is running and encounters a step that has been marked ABANDONED in the previous failed job execution, it moves on to the next step (as determined by the job flow definition and the step execution exit status).
If the process died (kill -9 or server failure), the job is, of course, not running, but the JobRepository has no way of knowing because no one told it before the process died. You have to tell it manually that you know that the execution either failed or should be considered aborted (change its status to FAILED or ABANDONED). This is a business decision, and there is no way to automate it. Change the status to FAILED only if it is restartable and you know that the restart data is valid.
'Web > spring' 카테고리의 다른 글
| [Spring Junit Test] 2.5. Assertions (0) | 2023.03.20 |
|---|---|
| [Spring Junit Test] 2.1. Annotation (0) | 2023.03.20 |
| [Spring Batch] Configuring and Running a Job - (5) Running a Job (0) | 2023.03.19 |
| [Spring Batch] Configuring and Running a Job - (4) Configuring a JobLauncher (0) | 2023.03.17 |
| [Spring Batch] Configuring and Running a Job - (3) Configuring a JobRepository (0) | 2023.03.16 |

